
Temenos Lifecycle Management Suite - Collection Product Guide
Instance Manager
Instance Manager provides the ability to install and manage multiple instances of a Temenos Infinity environment at an institution.
To obtain the installer for Instance Manager, please contact a Temenos representative.
Upon selecting Run as Administrator, the file extraction begins. A pop-up window displays the status.
 |
Upon launching the installer, it disappears from the task bar. It may take up to ten minutes to reappear and initiate. Do not attempt to re-launch the installer. |
Once the extraction completes, the Instance Manager window opens.
Navigate through the following steps to complete the installation of Instance Manager
Read the Temenos Infinity License Agreement.
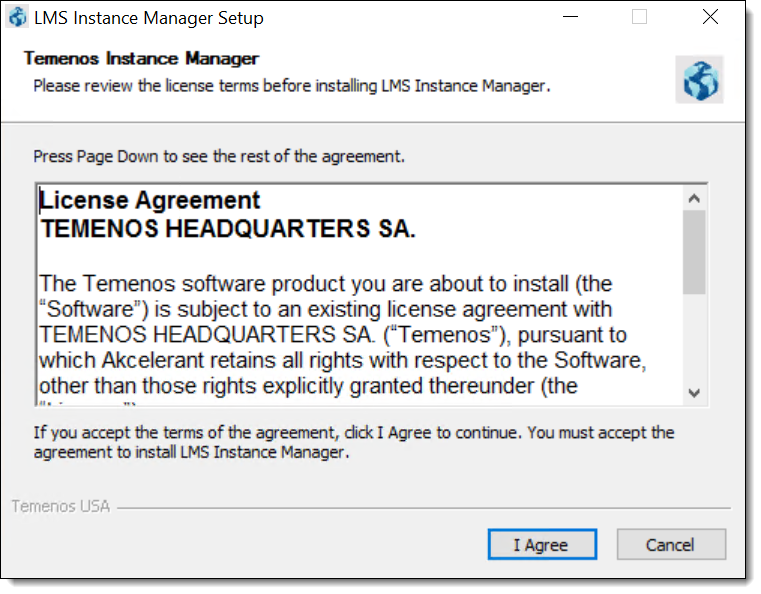
If the terms are acceptable, click I Agree.
|
If the terms are not acceptable, click Cancel to exit the installation. |
Click Next to proceed to the next installation step.
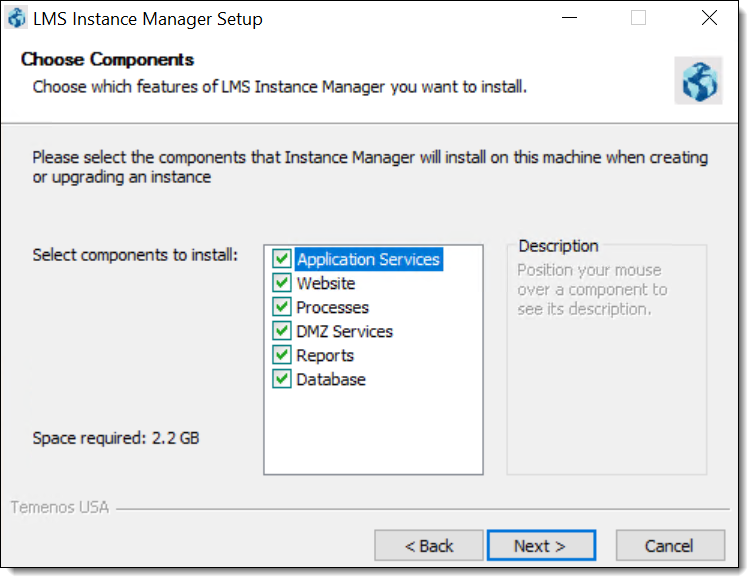
Six features are available for installation. Each feature, except for the DMZ services, must be installed. These features can be installed on one server, or across multiple servers, depending on the financial institution's configuration. Determine the features to be installed by selecting the check box next to the desired component(s).
|
By default, all components are selected for installation. |
The following table provides a description of each feature:
| Feature | Description | ||||
| Application Services | This feature is required and includes critical service applications that support the website and the API. This feature is typically installed on the same server as the Website feature. | ||||
| Database |
This feature is required and installs the Temenos SQL Server database on the SQL server. This feature should be installed on the application server as it creates the database remotely on the SQL server.
|
||||
| DMZ Services |
This feature is optional and provides services used by externally facing connectors for the Collection solution and the Loan Origination solution such as WebLoan, CUDL, Dealertrack, and RouteOne.
|
||||
| Processes |
This feature is required and includes Windows services and batch executable programs which are critical for daily processing. This feature is typically installed on the same server as the Web and Application Services features.
|
||||
| Reporting Services |
This feature is required and installs all of Temenos Infinity's pre-defined reports as well as the services that support capabilities to create, edit, and execute reports. This feature is typically installed on the same server as the Web and Application Services features and, when configured, attach to the SQL Server for linking data to the reports.
|
||||
| Website |
This feature is required and installs the Temenos Infinity website that end users access through their browsers.
|
Once all components have been identified, click Next.
A default installation location is selected by the installer, but this location can be changed by manually entering the location of the destination folder within the text box, or clicking Browse to locate the folder.
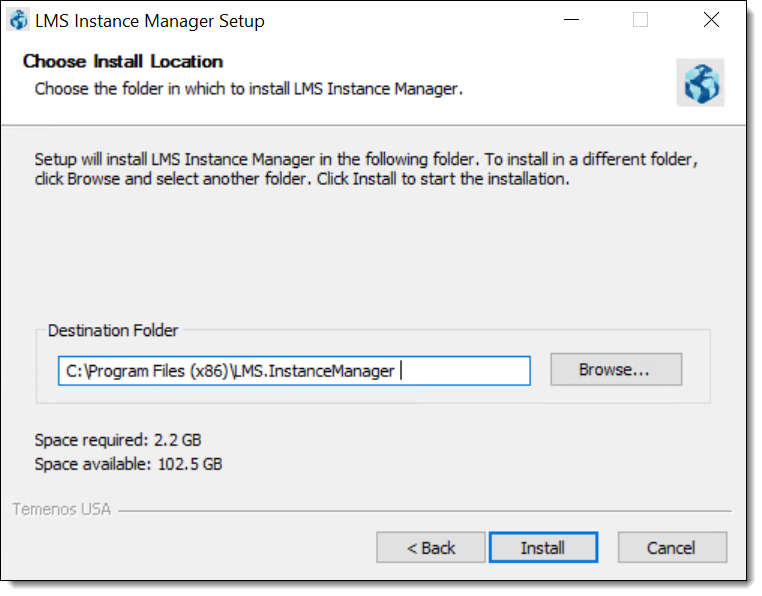
Once the destination folder is identified, click Install to initiate the installation process.
Upon clicking Install, a Status bar appears to display the progress of the installation. When finished, the status bar updates to Completed, and a message appears to identify that the setup was successful.

Click Close to exit the Instance Manager Setup window.
Once the installation process is complete, Instance Manager is available on the server to create and manage the Temenos instances at an institution.
The following tabs are available within Instance Manager to provide an overview of the installed instances at an institution, display the status of upgrades as they run, and create, upgrade, and/or delete instances as necessary:
The Installed Instances tab displays an overview of the installed instances at an institution, and provides the ability to easily access Server Manager for a particular instance.
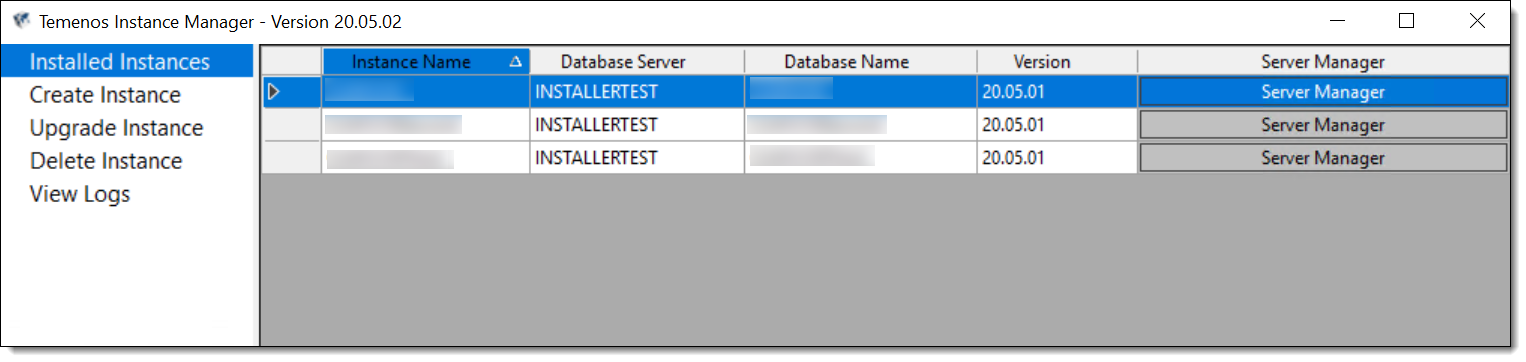
The grid in this tab displays the following columns of information for each instance:
| Column | Description | ||
| Instance Name |
Displays the name of the instance.
|
||
| Database Server | Displays the database server of the instance’s database. | ||
| Database Name | Displays the name of the instance database. | ||
| Version | Displays the current installed version of the instance. | ||
 |
Provides the ability to open Server Manager for that instance. Upon clicking this button, Server Manager opens in a new window.
|
The Create Instance tab provides the ability to enter the information required to create a new instance of Temenos Infinity.
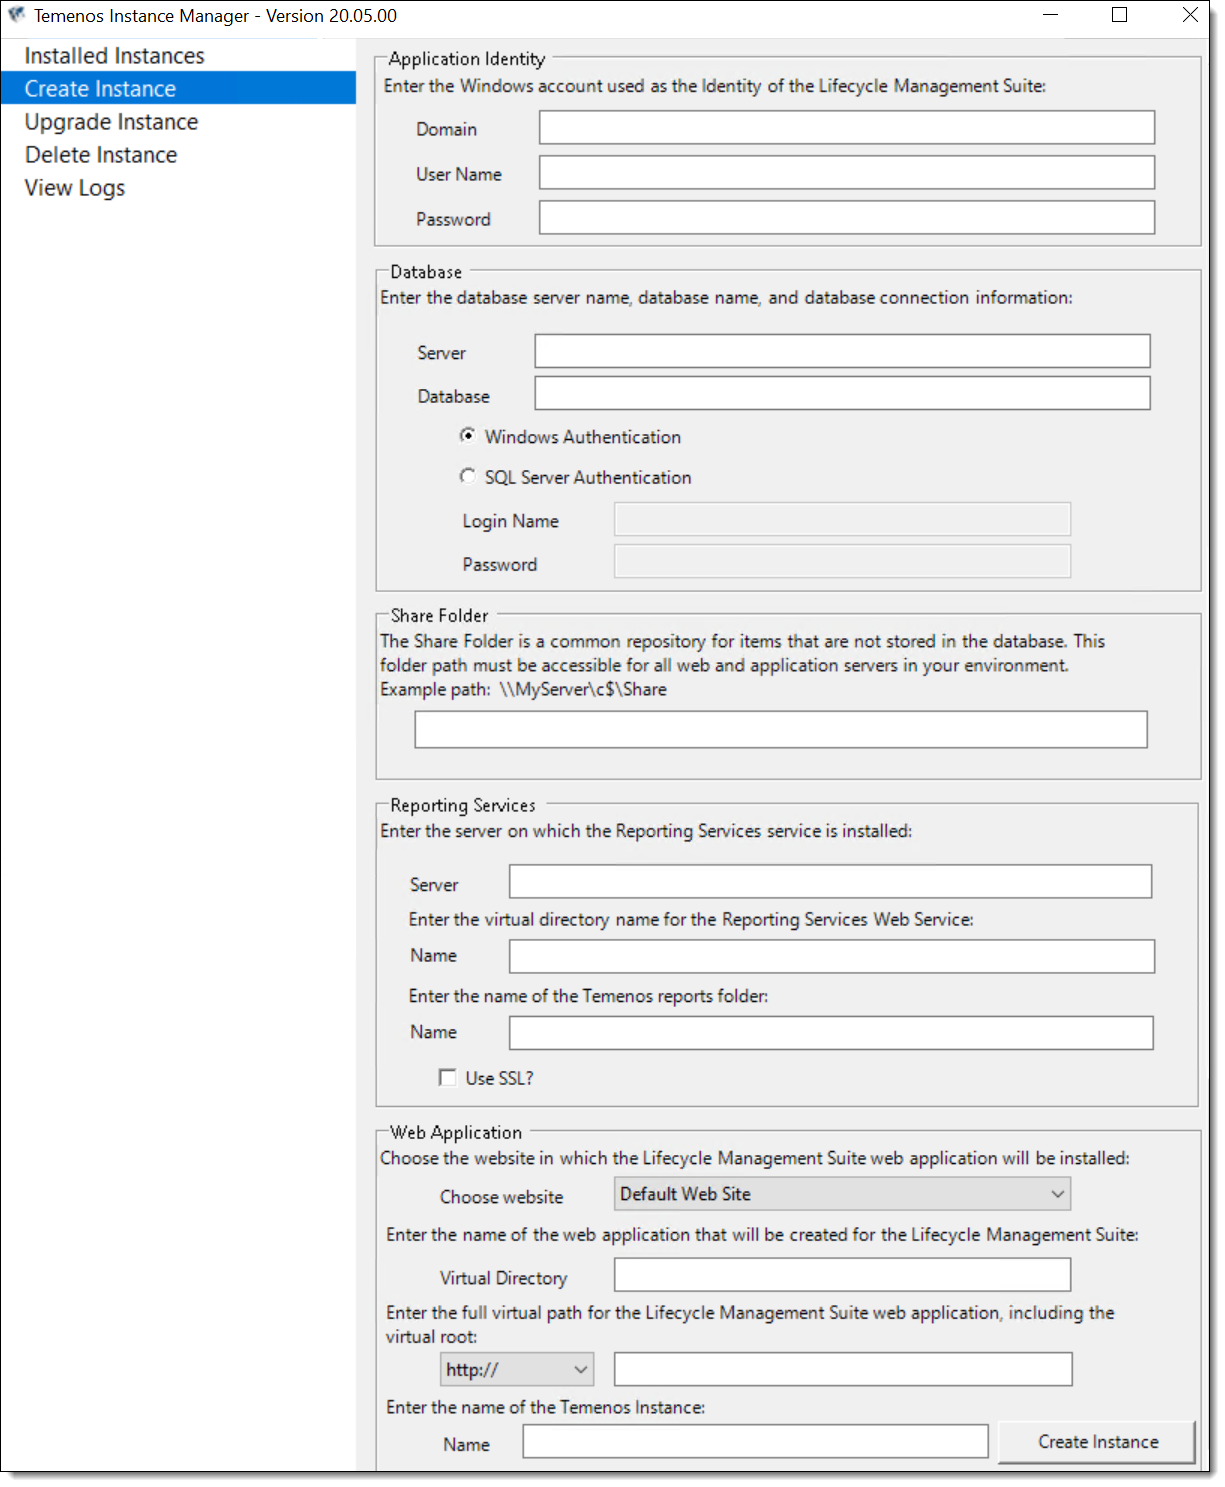
This tab includes the following sections of information to complete for each instance:
| Field | Description | ||
| Application Identity | |||
| This section provides the ability to identify the Windows account information for the instance. | |||
| Domain |
Enter the domain for the instance's Windows account. |
||
| Username | Enter the username to connect to the instance's Windows account. | ||
| Password | Enter the password to connect to the instance's Windows account. | ||
| Database | |||
| This section provides the ability to configure the database server name, database name, and database connection information for the instance. | |||
| Server |
Enter the server name for the database. |
||
| Database | Enter the name of the database. | ||
| Database Connection |
Select Windows Authentication or SQL Server Authentication to identify how the instance connects to the database.
|
||
| Share Folder | |||
| This section provides the ability to identify the share path location for the instance. | |||
| Share Folder | Enter the folder path location for the share path associated with the instance. This text box pre-populates with C://Share. | ||
| Reporting Services | |||
| This section provides the ability to configure the instance's Reporting Services service. | |||
| Server | Enter the server on which the Reporting Services service is installed. | ||
| Name | Enter the name of the virtual directory for the Reporting Services Web Service. | ||
| Name | Enter the name of the Temenos reports folder. | ||
| Use SSL? | Select the check box if the Report Server is configured for SSL. | ||
| Website | |||
| This section provides the ability to configure settings for the Temenos Infinity web application. | |||
| Choose Website |
Select the parent website for the Temenos Infinity web application.
|
||
| Virtual Directory | Enter the name of the web application to be created for Temenos Infinity. | ||
| Virtual Path | Enter the full virtual path for the web application, including the virtual root. | ||
| Temenos Instance | |||
| Name |
Enter a unique name for the Temenos instance.
|
||
To create an instance:
|
If the name of the instance already exists, an error is displayed to identify that the instance name already exists, and a new name must be entered. Similarly, if all required fields are not configured for the instance, an error is received upon clicking Create Instance. |
The Upgrade Instance tab provides institutions with the ability to upgrade their installed instances.
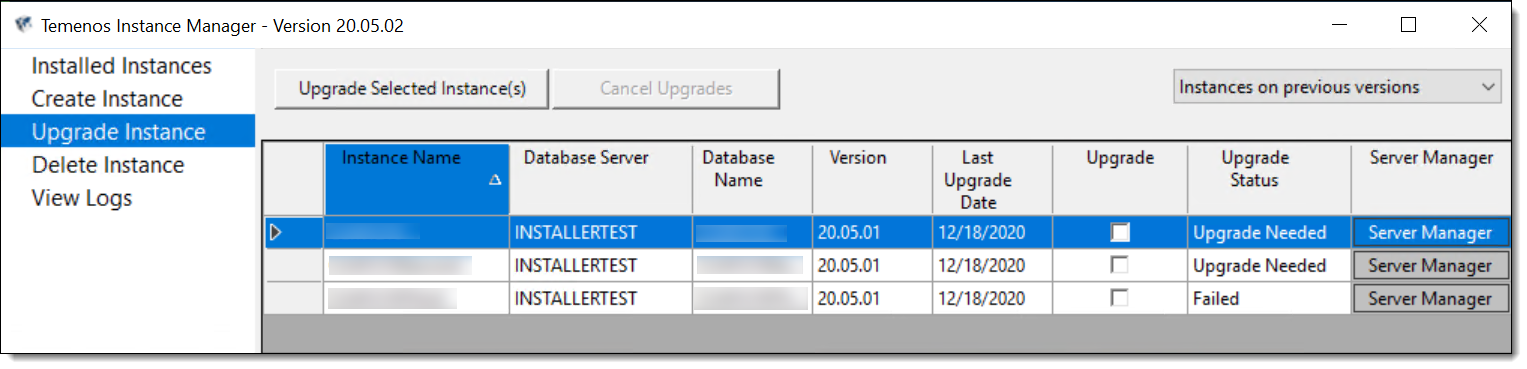
The grid in this tab displays the following columns of information for each instance:
| Column | Description | ||||||||||||||
| Instance Name |
Displays the name of the instance.
|
||||||||||||||
| Database Server | Displays the database server of the instance’s database. | ||||||||||||||
| Database Name | Displays the name of the instance database. | ||||||||||||||
| Version | Displays the current installed version of the instance. | ||||||||||||||
| Last Upgrade Date | Displays the date the instance was created or the last date the instance was successfully upgraded. | ||||||||||||||
| Upgrade |
Provides the ability to select the desired instances to upgrade.
|
||||||||||||||
| Upgrade Status |
Displays one of the following values to identify the status of the upgrade for an instance:
|
||||||||||||||
 |
Provides the ability to open Server Manager for that instance. Upon clicking this button, Server Manager opens in a new window.
|
The drop-down list in the top of the tab allows users to filter the instances that appear within the grid according to their version, or automatically select certain instances for upgrade.
This drop-down includes the following options:
| Version Selection | Description |
| Instances on previous versions | Displays the instances that are not on the current version of instance manager. This is the default value for the drop-down list. |
| Instances on the current version | Displays the instances that are on the current version of instance manager. |
| All instances | Displays all instances on all versions of instance manager. |
| Upgrade instances on previous versions | Automatically selects the ‘Upgrade’ box for all instances on old versions of instance manager. |
| Upgrade all instances | Automatically selects the ‘Upgrade’ box for all instances. |
This tab also includes the following buttons to start or cancel the upgrade process:
| Button | Description | ||
| Upgrade Selected Instance(s) |
Initiates the upgrade process for the selected instance(s).
|
||
| Cancel Upgrade(s) |
Cancels the upgrade process for the selected instance(s).
|
The Upgrade Selected Instance(s) button initiates the upgrade process for the instances selected within the Upgrade Instance tab.
To upgrade one or more an instances:
The Cancel Upgrade(s) button provides the ability to cancel the upgrade process for the selected instance(s). By default, this button is disabled until two or more instances are selected to upgrade.
To cancel the upgrade process:
|
If more than one instance in being upgraded, all completed upgrades are unaffected when the upgrade process is cancelled, and any upgrades that have not started are not attempted. |
The Delete Instance tab provides institutions with the ability to remove installed instances from Instance Manager.
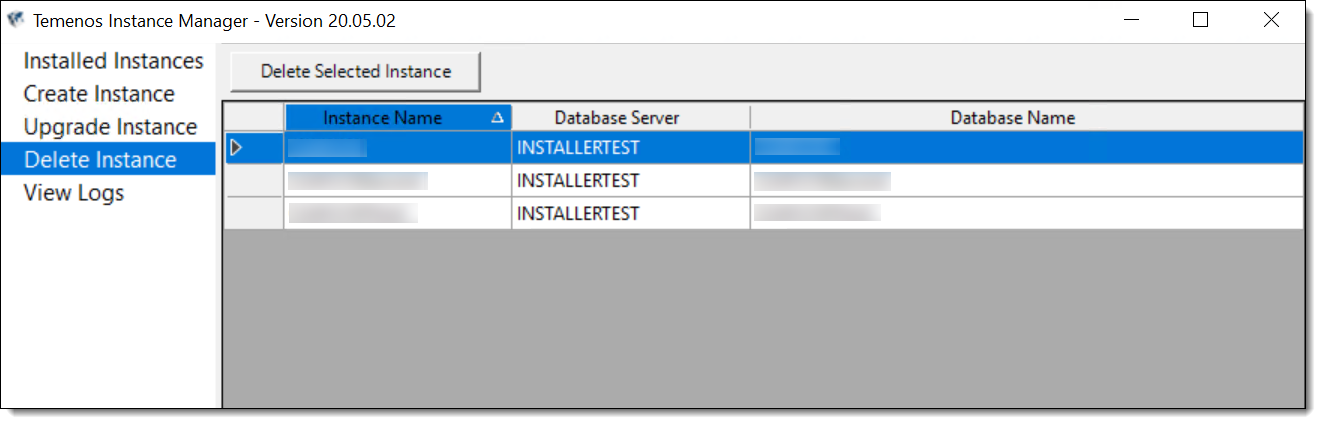
The grid in this tab displays the following columns of information for each instance:
| Column | Description | ||
| Instance Name |
Displays the name of the instance.
|
||
| Database Server | Displays the database server of the instance’s database. | ||
| Database Name | Displays the name of the instance database. |
The Delete Selected Instance button provides the ability to remove an instance from Instance Manager.
|
Only one instance can be deleted at a time; therefore, the Delete Selected Instance button is disabled when an instance removal is in progress. |
To delete an instance:
|
All LMS and Reporting Services databases for the instance are NOT removed. |
The View Logs tab provides institutions with the ability to review the status of new installs and upgrades as they run, as well as errors that occur.
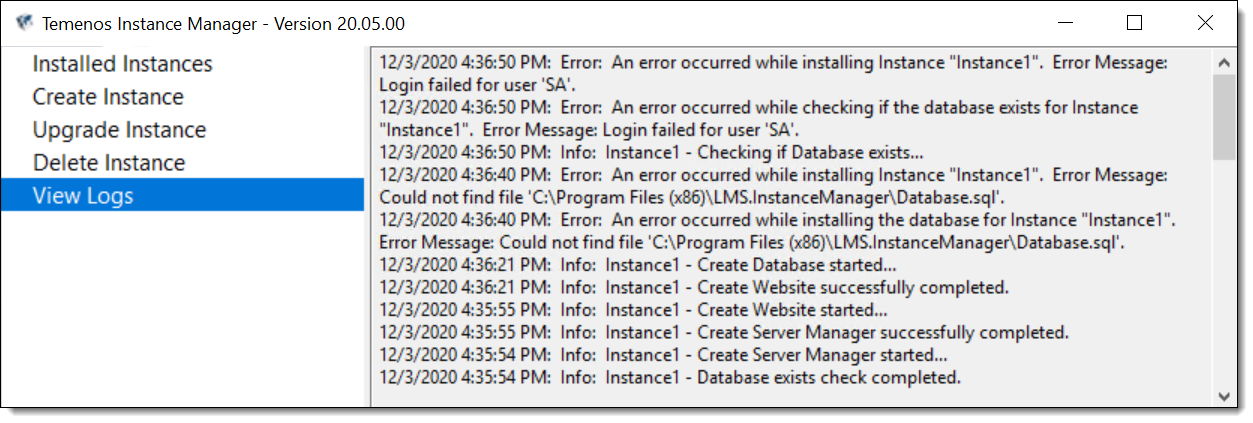
This tab is a read-only text box that displays the progress of new installs and upgrades launched in Instance Manager, as well as details for any errors that occur during the installation or upgrade.
 |
Logs are displayed in descending order with the most recent records at the top. |
|
This tab provides a high-level overview of status information. A full overview can be viewed within the log on the server. |
